This page provides step-by-step instructions on how to set up alerts, automations and schedules with the XFINITY Home Security Web Portal.
Simply select an item below and click the “Expand to View Steps” arrow to reveal the pertinent instructions.
Alerts

Receive an Email or Text Message with Video Clip When a Door is Opened
Know when your children have arrived home from school, and if they brought friends. Point one of your camera towards the door.
Expand to View Steps
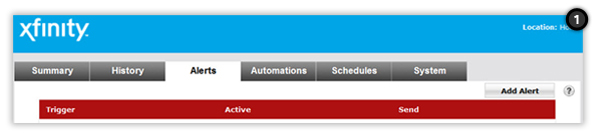 |
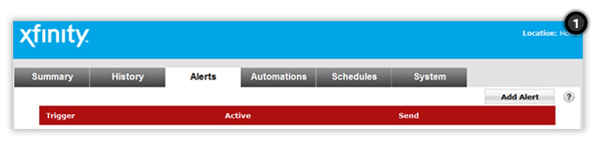
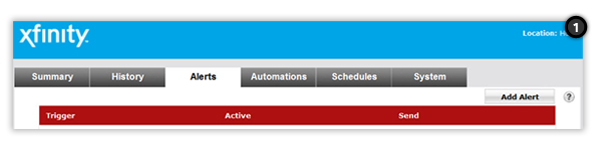
- 1. In the Alert Tab, click Add Alert
|
 |
- 2. Click When something hapens and then OK
|
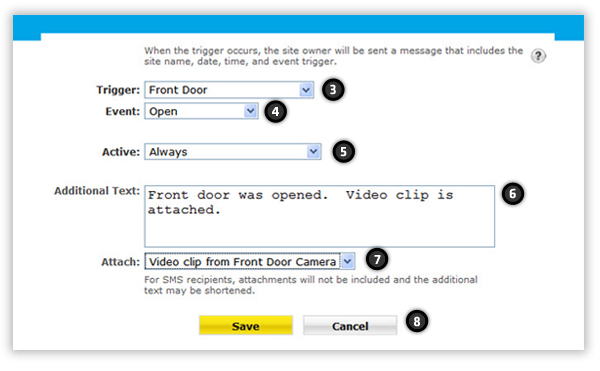 |
- 3. In the Trigger menu, choose a door
- 4. In the Event menu, choose Open
- 5. Select Always in the Active menu if you want to receive the alert every time the door is open. Or, select During Select Times/Days or In Select Modes to customize
- 6. Insert a message in the Additional Text box (e.g., “Front door was opened. Video clip is attached.”)
- 7. In the Attach menu, select Video Clip From [Camera Name] Camera
- 8. Click Save
|
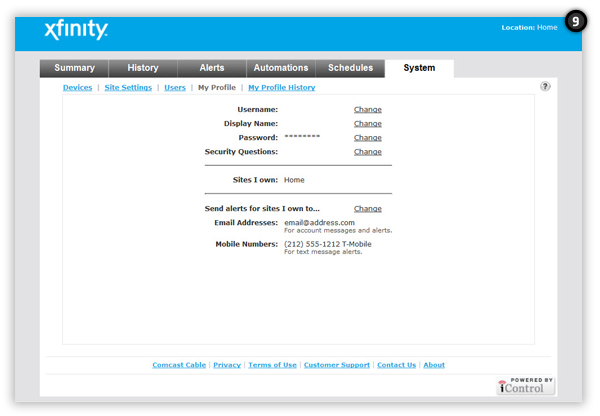 |
- 9. Emails and text messages will be sent to the addresses and mobile phone numbers listing in the My Profile section in the System tab
|
Receive an Email or Text Message When An Event Does Not Occur
Know if the dog walker or maid did not arrive during a specified time.
Expand to View Steps
 |
- 1. In the Alerts Tab, click Add Alert
|
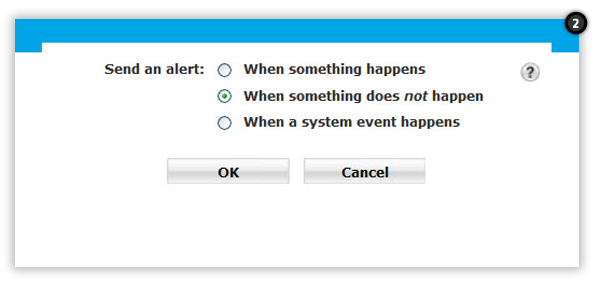 |
- 2. Click When something does not happen and then OK
|
 |
- 3. In the Trigger menu, choose a door
- 4. In the Event menu, choose Open
- 5. Select During Select Times/Days in the Active menu to customize
- 6. Choose the start and end times and applicable days and modes you’d like the alert to be active
- 7. Insert a message in the Additional Text box (e.g., “Dog walker did not arrive by 4:00 PM today.”)
- 8. Click Save
|
|
- 9. Emails and text messages will be sent to the addresses and mobile phone numbers listing in the My Profile section in the System tab
|
Receive an Email or Text Message When A System Event Occurs
Know if your security alarm has been triggered, a device was tampered, or other events.
Expand to View Steps
 |
- 1. In the Alerts Tab, click Add Alert
|
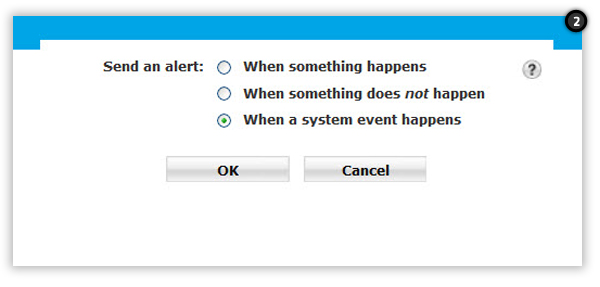 |
- 2. Click When a system event happens and then OK
|
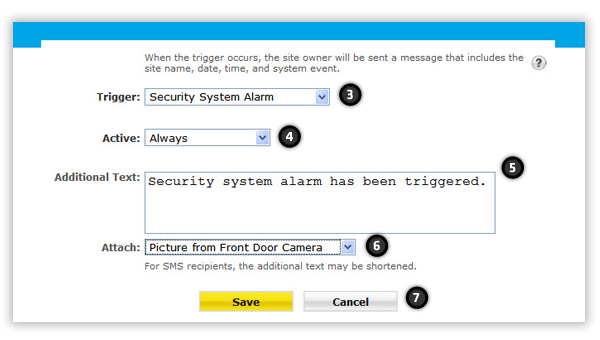 |
- 3. In the Trigger menu, choose an event
- 4. Select Always in the Active menu if you want to receive the alert anytime. Or, select In Select Modes to customize
- 5. Insert a message in the Additional Text box (e.g., “Security system alarm has been triggered.”)
- 6. Attach a video clip or picture to the alert using the Attach menu
- 7. Click Save
|
 |
- 8. Emails and text messages will be sent to the addresses and mobile phone numbers listing in the My Profile section in the System tab
|
Automations

Capture a Video Clip When a Door is Opened
Always know who’s entering your home
Expand to View Steps
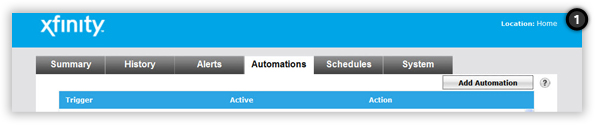 |
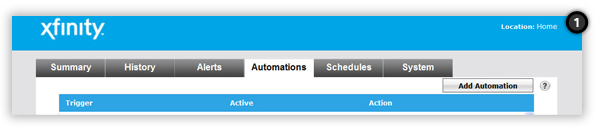
- 1. In the Automations Tab, click Add Automation
|
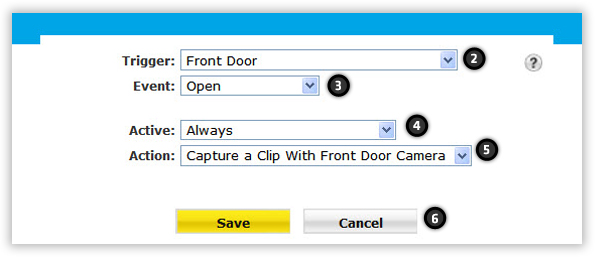 |
- 2. Select a door as the Trigger (e.g., Front Door)
- 3. Select Open as the Event
- 4. Select Always in the Active menu if you want the automation to occur every time the door is open. Or, select During Select Times/Days or In Select Modes to customize
- 5. In the Action menu, select Capture A Clip With [Camera Name] Camera
- 6. Click Save
|
Set a Lamp to Turn On When a Door is Opened
Save electricity when you’re not home, and illuminate the premises when you arrive.
Expand to View Steps
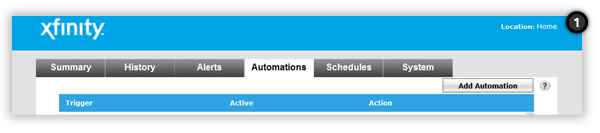 |
- 1. In the Automations Tab, click Add Automation
|
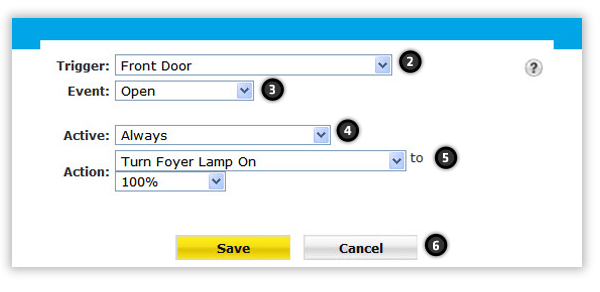 |
- 2. Select a door as the Trigger (e.g., Front Door)
- 3. Select Open as the Event
- 4. Select Always in the Active menu if you want the automation to occur every time the door is open. Or, select During Select Times/Days or In Select Modes to customize
- 5. In the Action menu, select Turn [Light Name] On and then 100%
- 6. Click Save
|
Turn Thermostat Off When Security System is Armed
Save money on your utility bills by setting your thermostat to turn off when you leave your home.
Expand to View Steps
 |
- 1. In the Automations Tab, click Add Automation
|
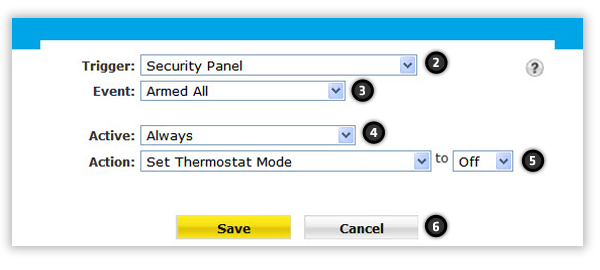 |
- 2. Select the Security Panel as the Trigger
- 3. Select Armed Doors and Windows or Armed All as the Event
- 4. Select Always in the Active menu if you want the automation to occur every time you arm your system. Or, select During Select Times/Days or In Select Modes to customize
- 5. In the Action menu, select Set Thermostat Mode and then select Off as the mode
- 6. Click Save
|
Schedules

Schedule Thermostat to Turn Off/On During the Day
Save money on utility bills by setting your thermostat to turn off when you leave in the morning and turn back on before you arrive home.
Expand to View Steps
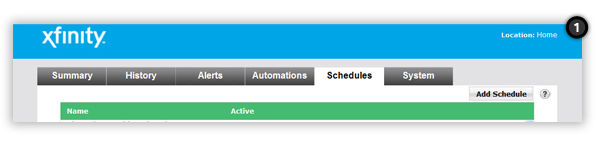 |
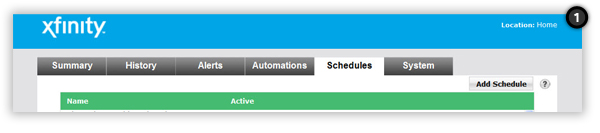
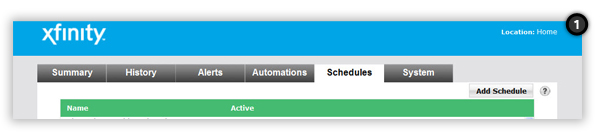
- 1. In the Schedules Tab, click Add Schedule
|
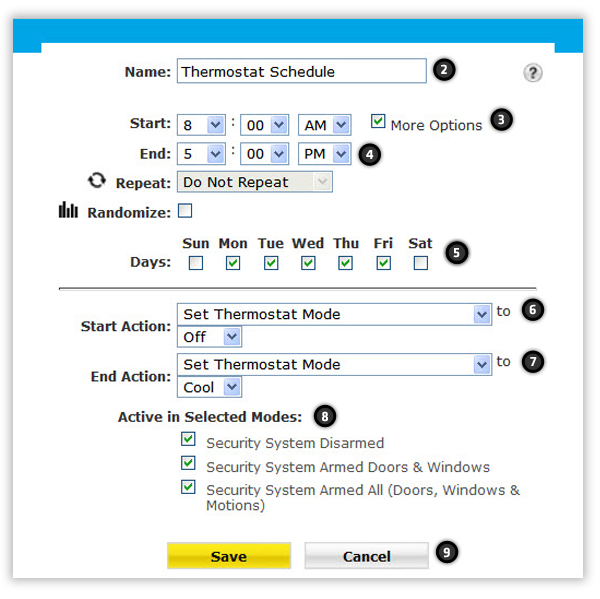 |
- 2. Enter a name for your schedule (e.g., “Thermostat Schedule.”)
- 3. Enter When you want the thermostat to turn off (e.g., when you usually leave for work) and then check More Options
- 4. Enter the End time which will be the time the thermostat will turn back on (e.g., when you usually arrive home from work)
- 5. Determine the Days you want this schedule to apply by checking the applicable boxes
- 6. In the Start Action menu, select Set Thermostat Mode and then Off
- 7. In the End Action menu, select Set Thermostat Mode and then either Heat or Cool
- 8. Check the Modes you want the schedule to apply
- 9. Click Save
|
Schedule Lights to Turn On and Off While You’re Away From Home
Make your home appear occupied even when you’re not there.
Expand to View Steps
 |
- 1. In the Schedules Tab, click Add Schedule
|
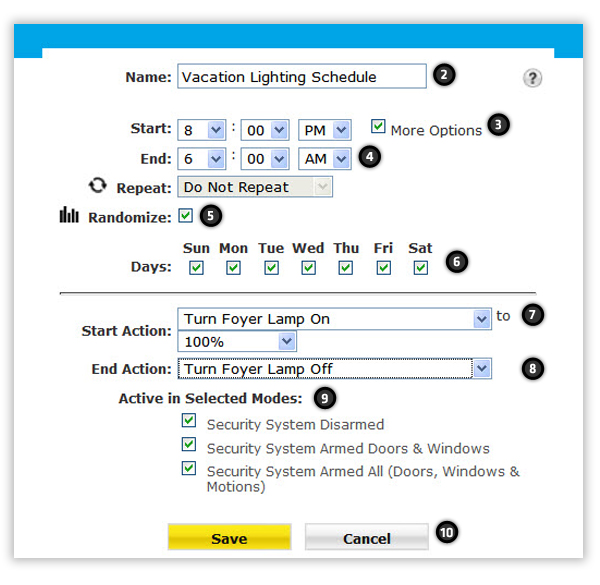 |
- 2. Enter a name for your schedule (e.g., “Vacation Lighting Schedule.”)
- 3. Enter When you want the lighting schedule to start (e.g., when it gets dark in the evening) and then check More Options
- 4. Enter the End time which will be the time the lighting schedule stops (e.g., early in the morning when the sun usually rises)
- 5. Click the Randomize box
- 6. Determine the Days you want this schedule to apply by checking the applicable boxes
- 7. In the Start Action menu, select Turn [Light Name] On and then 100%
- 8. In the End Action menu, select Turn [Light Name] Off
- 9. Check the Modes you want the schedule to apply
- 10. Click Save
|
Schedule Security System to Arm Itself in the Morning
Ensure your home is secure even if you forgot to arm your system yourself.
Expand to View Steps
 |
- 1. In the Schedules Tab, click Add Schedule
|
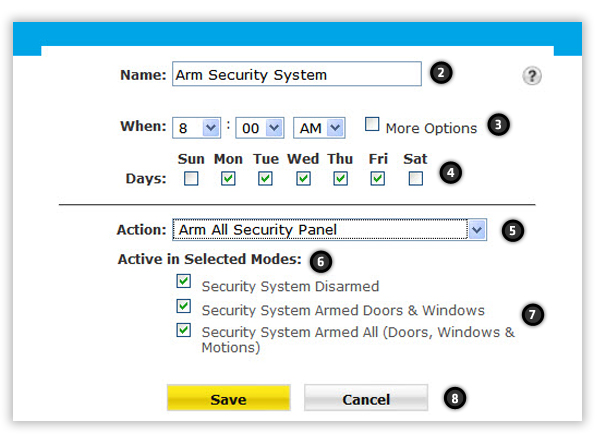 |
- 2. Enter a name for your schedule (e.g., “Arm Security System”)
- 3. Enter When you want the security system to arm (e.g., shortly after you leave for work everyday.)
- 4. Determine the Days you want this schedule to apply by checking the applicable boxes
- 5. In the Start Action menu, select Arm Doors and Windows Security Panel or Arm All Security Panel
- 6. Check the Modes you want the schedule to apply
- 7. Click Save
|